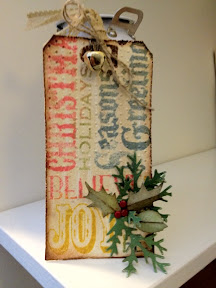
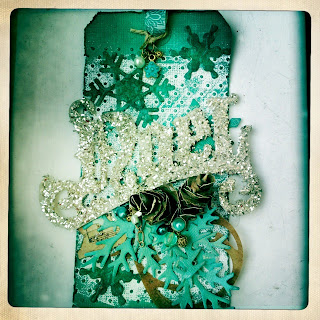
Showing posts with label tim holtz. Show all posts

Sunday, 9 February 2014

Valentine


Early February & our thoughts turn to luuuuurve. Here's a Valentine card for my other half (oh yes, he does not escape my pop-up frenzy!!).


I used the Karen Burniston Sizzix Pop n Cuts label die & cut a keyhole in the centre using a Tim Holtz Movers & Shapers die. The layered hearts at the back are Spellbinders. 


I die cut the Tim Holtz flourish & connected it between the background & the pop up to add further dimension. You can then add hanging items to it, like the layered labels shown here. 

Ok, that's it.  I am all pop-upped out for now.  

Thanks 'sew' much


Totally in love with this pop up thank you card, despite the rotten pun. 


Lots of die cutting on this card. Pop up 'Thanks' & card base dies by Karen Burniston for Sizzix. The dress form, buttons & cotton reels are the Tim Holtz Sizzix die. The layered labels are Spellbinders. Papers: DIY Shop (Crate Paper), Thrift Shop (October Afternoon) & Core-dinations (Tim Holtz Distress range).


I cut a slit in the top of the 'Thanks' die cut & sunk a support for the back of the dress form, to make sure it would fold flat.


Front - this is a detail from a larger Justrite background stamp, Grandma's Attic. 


Back - my hand writing isn't the greatest so for pop up cards, where the inside is the main feature, I tend to put space for a greeting on the back.

Saturday, 24 November 2012

Christmas bunting


Well. Clearly I'm ALL about the bunting at the moment.
 
This bunting project is easy peasy, but a bit fiddly. It took me the best part of a day to make. To be fair to me though, I AM very lazy and I DID have to keep stopping to watch TV, so you might find that you romp through it.


I made this bunting using the same Tim Holtz rosette die and Memory Box snowflake corner dies I used for the Halloween bunting. The only difference is that I layered up two cuts of the rosette die to make a bigger rosette. Tim's Youtube video explains how to do this. It's pretty straightforward.


DO stick tape of some kind to the back of the strip before you fold. It pretty much eliminates the problem of paper tearing and foul language that can happen when you fan the rosette out.
 
Also, keep the serrated edge waste from the die cut. You can use this to trim each piece of bunting in paper that matches the rosette (I used an old Cosmo Cricket Christmas range).


I secured the back of each rosette with the centre circle from the rosette die (because I'd made two cuts for each rosette, I had a centre to use front and back). Then I glued some vintage tiny tinsel to the back of the other centre circle, so that it peeped out round the edge. Then I glued that to the front of the rosette.
 
For the pennant, I hand cut some triangles and stamped them with a Tim Holtz snowflake stamp using distress ink. I used the second, third & fourth impressions (stamping the first impression onto scrap paper first, to get rid of the excess ink) as I wanted a faded background.
 
Light squirt of Perfect Pearls mist over the top (I used Heirloom Gold). Ink round the edges to give some definition.


The starburst at the back of the rosette is the Memory Box snowflake die. It's a corner die, so you need to cut four for each rosette. Line up the straight edges so that the right angles meet. Add glue to the back of the rosette and carefully place down. You might then want to fiddle a bit to get the best placement. (Be warned, these critters like to tangle and latch on to each other. A steady hand and low blood pressure are a boon at this point.)

Then glue the whole thing onto the triangle. I'd use a glue gun, you don't want that sucker falling off right when your visitors are standing before it, gazing in awe and wonder. The shame!


Hole punch each side and thread through some rustic twine.

Et voila. You got yourself a Christmas banner there, boy!


Friday, 2 November 2012

Halloween banner


This is one of my favourite makes ever! The Tim Holtz rosettes from earlier in the week mounted onto a spooky party banner. Took me minutes, but I love it.


Strangely, the four 8 year old boys in whose honour it was made failed to pass ANY. COMMENT. WHATSOEVER on it. Kids these days :-/


Monday, 29 October 2012

Halloween


My son is having a birthday sleepover for 3 friends on Thursday, so we're giving it a spoooky Halloween feel.

I made these rosettes using the Tim Holtz rosette die. Never really made anything I liked with it until now, but these look pretty good. Layering them up is definitely the key. I layered them up with a couple of star shaped die cuts and the tendrils are 4 Memory Box starburst corner die cuts. The spider stamp is from a Dylusions set.

Friday, 9 December 2011

12 Tags of Christmas: tag 7


I didn't have Tim's holly die, but i do have his holly stamp, so I stamped it onto glasseine with a mix of acrylic paint and distress ink, then spritzed with Heirloom Gold Perfect Pearls & cut out. The moon stamp is by Crafty Individuals.

Sunday, 4 December 2011

Twelve tags: day 4


I absolutely loved making this one and I'm so pleased with the results!


I didn't have the snowman die that Tim used, so I stamped his retro Father Christmas instead and used the same technique for colouring him. I stamped a second image on white card, and cut out and layered his face and the white trim.

Saturday, 3 December 2011

12 Tags of Christmas: day 3

Day 3 of Tim Holtz's 12 Tags of Christmas


This tag was not made with love & good cheer. It is mostly made of swearing and rage. I found the custom stamp pad technique really hard. I'm not terribly good at precision work and my ink bled all over the place. Then I lost the foliage I'd cut. Then I found it, stuck to the underside of the second craft tag. Then I knocked one of the re-inkers, which I'd neglected to re-cap, all over the first tag. Then I went and  bought a cardy online, to make myself feel better.

Friday, 2 December 2011

12 Tags of Christmas: tag 2

Another pretty slavish copy of Tim's gorgeous tag, but I don't have the time to exercise independant thought at the moment! It's so much easier & quicker when all the thinking has been dome for you.

I had the Kraft Resist, inks and Picket Fence stain. For the deer, I stamped one from one of Tim's seasonal silhouette sets using antique linen stain to get a softer look. I tried the splatter technique with the perfect pearls, but I only have gold and it doesn't show up as well as I expect the white does. The edging is a Martha Stewart punch painted in gold acrylic.

Really like the soft muted colours on this.

Thank you for your lovely comments yesterday, by the way. I am going to sit down tonight and make sure I visit each of your blogs x

Thursday, 1 December 2011

12 tags of Christmas : Day 1

So excited this has started. Never played along before.

This is my version of Tim Holtz's divine tag.


edited...


Sorry, I posted in a rush earlier. Here's a clearer pic.


I had Tim's Noel and pine cone dies, the rest I improvised.

My pine cones look a bit pneumatic.  Madonna's conical boobed Vogue period springs to mind. I like it.

Saturday, 12 November 2011

Pockets

Shimelle has posted about the joy of pockets in your Christmas journal, and I couldn't agree more!

I am a pocket junky. I love bits that come out and unfold and then slot back in (The Jolly Postman is my absolute favourite children's book because of this). I've made  five for my journal so far, but it may end up that pretty much every page has some sort of pull-out element.


This one is my favourite. It's a 12x12 bracket sheet cut into quarters and stitched together. A card or tag fits in the middle.


The ornament and Santa stamps are Tim Holtz for Stampers Anonymous.


I love this one too. A tag slots in behind Santa (a detail cut from Paperartsy paper). That tinsel's a bit wonky. Have to go back & fix that.


This one has a vertical pocket, that something will slide in behind (not the paper shown below, but you get the idea).


Finally, this is a 6x6 page protector, stitched down the middle to create two deep pockets. I've cut a single sheet of 6x6 in half and attempted to stamp a similar pattern on the plain back. It'll mostly be covered in journalling or by a photo anyway.


Sunday, 6 November 2011

Journal Your Christmas - covers

Better pictures. I'm pretty pleased with it, it's quite glittery which doesn't show up so well on the photos


Supplies: Tim Holtz - Kraft Resist paper, Distress Stain (white), distress inks, grunge board numbers and blocks, curio knob, tissue tape, christmas stamp, vintage Noel Die, Clear Rock Candy glaze. Prima Crystals